
getting started with Nanoloeaf Shapes
For my birthday, some family sent me a $200 gift card for Amazon. I wasn’t sure what I’d like. I have too many books queued up already, and just sort of enough stuff. I knew there’d be some toy or luxury that would be a good pick, but nothing sprang to mind. I mentioned this conundrum to Rob N, who said “Why not Nanoleaf?”
I didn’t recognize the name, but once I looked it up, I did. Nanoleaf makes a bunch of “smart” lighting stuff that may have seen, too. The most notable products are sticks or basic geometric shapes that snap together and light up independently. I said, “Colored lighting with an API? I’m in!” I had no idea what I’d do with them, and I still don’t, but I’ve certainly done some of it already.
I ordered the “modern” starter kit, which is a bunch of big and little triangles. They can snap together in different orientations. You use a little snap in piece of plastic that connects to both panels and also completes a circuit between them. There’s a controller that snaps on, too. It’s a little pad of buttons that connects to your wifi and passes on instructions to the lights.
To get started, you pair the controller to the Nanoleaf app on your phone, which provides it with wifi credentials. If you want, you can just stop here, using the smartphone app to control the lights. The app gives you three kinds of options:
- light all the panels with one color
- light all the panels with a mix of colors that cycle
- make the lights flash different colors based on ambient sound (music)
The first two are fine. The third one leaves me cold. It’s like those one of those “visualizers” built into older mp3 players that never quite seemed to have much to do with the music. This is all sort of irrelevant, though! I didn’t buy this thing because of presets, I bought it because of the API. So, what was that going to take?
the nanoleaf API docs are bad
I feel like “the datasheet for your electronics are bad” is a different genre
of bad than “the API for your smart device are bad”, but they’re related. The
docs for the Nanoleaf API are incomplete, very badly formatted, sometimes
incoherent, and behind a requirement to log in. The formatting is quite bad,
because of things like “parameters in URLs are presented as <param>, but the
angle brackets aren’t quoted, so you can’t see them at all; read the HTML
source”. Packet diagrams have headers that should be n-bits wide but all
collapse left, making it impossible to read the diagram.
The login requirement isn’t a big deal for me, but it meant that when I said, “Hey friends, can you look at this ambiguous documentation with me?” they’d say, “No, because we don’t have a login.” I took a lot of screenshots of my browser.
That said, I’ve been through this nonsense before. I was prepared.
Still, if you’re reading this Nanoleaf: give me commits to your documentation repository and builder and I’ll make things better!
discovery
If you have read me talk about futzing with programmable lights before, you may have read my post about mDNS for discovering the Philips Hue Bridge. The short version is: that’s how discovery for Nanoleaf works, too. It also supports SSDP, like Philips Hue, but I decided to stick with mDNS, as a generally better technology.
I decided to write my first pass at all this stuff in Perl, although I may well
switch to Python now that I figured how to make it all go. Perl doesn’t have
a mDNS library that I like, so I just stuck the device’s .local name into a
config file. If I wanted to make my program automatically discover new Shapes,
this wouldn’t be good enough, but I think $200 of toy is probably enough toy.
Anyway: not too much to say about discovery, because it’s the same old same old. Great!
the HTTP API
Like other smart devices, Nanoleaf has an API that’s a little weird, but mostly just “use normal HTTP methods to deal with JSON”. Everybody knows that’s what I want out of an API, so I started out theoretically happy.
The root of the API is:
https://your-device.local.:16021/api/v1/{your-auth-token}
In theory, the port number can vary, but I get the impression it never does.
It’s in the mDNS discovery data, though. Oh, and see that {your-auth-token}?
That’s one of the things often found in the official docs as <auth_token>,
and therefore never rendered. Yow!
Before you can make any other API calls, you’ll need one of those auth tokens.
They’re easy to get. First, you hold down the power button for about seven
seconds, until the lights on the control panel start flashing. Then you can
POST an empty body to /api/v1/new. You’ll get back a JSON document with your
auth token. Save that, you’ll need it!
With that, if you GET the root of the API (that URL above, ending in your auth token), you get something like this:
{
  "name": "Shapes B77A",
  "serialNo": "...",
  "manufacturer": "Nanoleaf",
  "firmwareVersion": "9.2.0",
  "hardwareVersion": "1.4-0",
  "model": "NL42",
  "discovery": {},
  "effects": {
    "effectsList": [
      "Beatdrop",
      "...",
    ],
    "select": "...",
  },
  "firmwareUpgrade": {},
  "panelLayout": {
    "globalOrientation": {
      "value": 240,
      "max": 360,
      "min": 0
    },
    "layout": {
      "numPanels": 3,
      "sideLength": 27,
      "positionData": [
        {
          "panelId": 22456,
          "x": 73, "y": 58, "o": 0,
          "shapeType": 9
        },
        {
          "panelId": 9927,
          "x": 106, "y": 77, "o": 60,
          "shapeType": 9
        },
        {
          "panelId": 0,
          "x": 47, "y": 73, "o": 60,
          "shapeType": 12
        }
      ]
    }
  },
  "qkihnokomhartlnp": {},
  "schedules": {},
  "state": {
    "brightness": { "value": 100, "max": 100, "min": 0 },
    "colorMode": "effect",
    "ct": { "value": 2700, "max": 6500, "min": 1200 },
    "hue": { "value": 0, "max": 360, "min": 0 },
    "on": { "value": true },
    "sat": { "value": 0, "max": 100, "min": 0 }
  }
}
I’ve included more or less everything, just so you can see that there isn’t so
much to see. Most importantly, I think: you can see each panel, in the
panelLayout section, but you can’t see which is linked to which, nor can you
see their current color. Not showing current color makes sense, when the
setting might be “pulse continuously”, so the color would only be valid for a
split second.
Other interesting keys include effects, which tells you what effects have
been programmed in and which is chosen, and qkihnokomhartlnp, which I don’t
know what it is.
Really, all I have ended up caring about here are:
.state.on: is the thing even turned on? when the panel display is not on, the controller is still available, and you can turn the display on via the API.effects.select: where you can see the current display setting.panelLayout.layout.positionData: where I find the panels and their locations
building custom animations
I’m not sure I’ll use this, but I might! Still, it seemed like the thing are most likely to do. First, though: what is an animation?
Well, it’s probably exactly what you expect. It’s a set of display changes, with timing, possibly on a loop. So, if you pick the predefined “Sundown” animation, the panels will begin to cascade red to orange to yellow on a loop, forever. The system came with about a dozen preset animations, which seem like they might be just for for creating a little ambiance in your room. But I’m not here for ambiance, I’m here for screwing around.
An animation is basically defined like this:
nPanels
    [0] panelId_0 nFrames
        [0] r g b w time
        …
        [n] r g b w time
    [1] panelId_1 nFrames
    …
    [n] panelId_n nFrames
The things in brackets are just so you can see things that repeat. The short English description is: First, the number of panels involved in the animation. Then, for each panel, its identifier followed by the number of frames that panel will animate through. Then, for each frame, RGBW values and a transition time. The RGBW value for a frame is four numbers, each ranging from 0 to 255, for the intensity of red, green, blue, and white. (Actually, though, white is always ignored.) Transition times are given in deciseconds.
When you provide the animation to the server, it’s given as a string. So, imagine you have two panels. Their ids are 123 and 678. You want them to blink red and blue, alternating. Your animation would look like this:
/* two panels           */  2
/* panel 123, 2 frames  */    123 2
/*   over 1s, turn red  */      255   0   0   0 10
/*   over 1s, turn blue */        0   0 255   0 10
/* panel 321, 2 frames  */    321 2
/*   over 1s, turn blue */        0   0 255   0 10
/*   over 1s, turn red  */      255   0   0   0 10
Or, as the kind of string you’d actually send to the API:
"2 123 2 255 0 0 0 10 0 0 255 0 10 321 2 0 0 255 0 10 255 0 0 0 10"
This string gets sent to the controller as part of a “set effect” command. This is one of the places the API documentation was wrong, or at the very least, very bad. The JSON sent to the server needs a top-level “write” key. I think maybe section 5.4.3 and surrounding of the docs are supposed to sort of document this, but it really doesn’t get the point across. I struggled with this a few times, and now you shouldn’t have to.
To set your two-panel Nanoleaf Shapes setup to use the above animation, you’d
PUT the following JSON to /api/v1/{your-auth-token}/effects:
{
  "write": {
    "animType": "custom",
    "animData": "2 123 2 255 ...",
    "command": "display",
    "loop":     true,
    "palette": [],
  }
}
What’s palette for? Something to do with predefined plugins that I didn’t
try yet. These actually look useful, so I should look into them. They let you
say something like: “Here are six colors. Animate them across my panels as a
wheel.” This is useful, because without this, you have to figure out how the
panels are laid out. Sure, you have the data to do that, but it’s a bit of a
pain.
Anyway, with the knowledge above, all you have to do is think of what a cool animation would be, then send it to the device and see whether it’s actually cool. You’ll need to know the panel ids of the panels, though. You could figure it out by looking at their position data, but I did something simpler. I wrote a program to light each panel up a different color and then print out which is which. I can run it and get the following terminal output and panel display:
$ ./demo/panel-ident
1234        blue    (  0,  1), 180°
2345         red    (  1,  1),   0°
9123       green    (  1,  0), 180°
3019       white    (  0,  0),   0°
9992      purple    ( -1,  0), 180°
  16        cyan    ( -1,  1),   0°
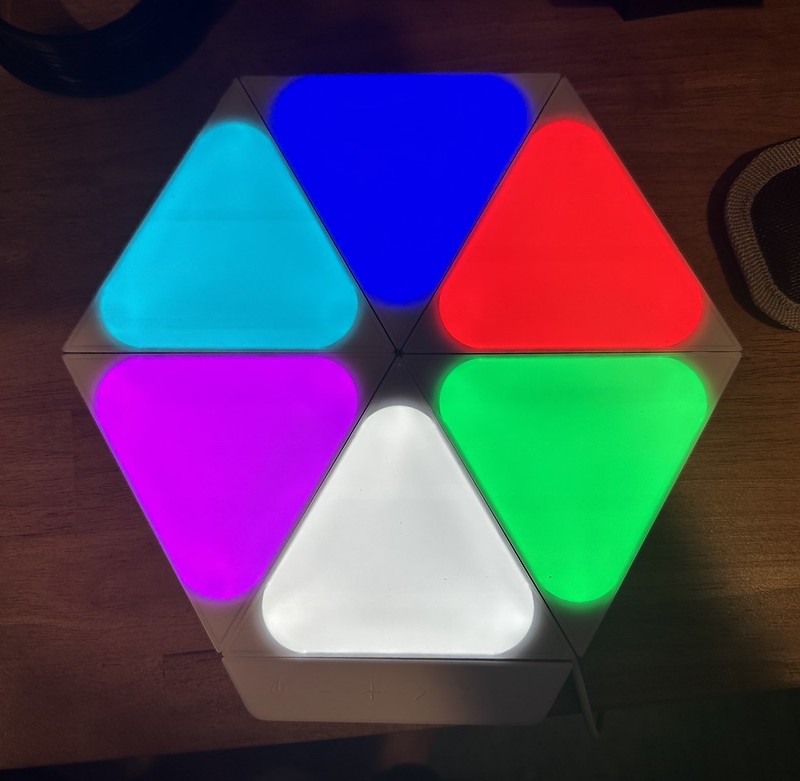
The x and y values above are fabrications. In reality, they’re more surprising, as the axes don’t appear to follow the device orientation. If I sort that out, it’ll be in a future post. For now, I’ve been trying to ignore the actual meaning of the position and orientation data, except for computing distance between pairs of panels.
When I wrote the panel identifier, I didn’t actually use the custom animation PUT endpoint. Instead, I used the command streaming interface, which I will write about… in my next post.